View Builder: lay out every Rose Rocket record page
View Builder is where an admin lays out every Rose Rocket record page: its tabs are views, each view is rows of panels, and nothing changes until Publish.
On this page3 sections
- Before and after
- What it does
- A view is a tab on the record page
- A panel is a box of widgets, with a gear
- Open View Builder from any record
- Build a basic view, from an empty canvas to Publish
- Choose a panel’s widgets and how they show
- Put the fields a billing clerk needs in the header
- Hide recipe views so your team sees only yours
- Lay out the form itself in Object Builder, once
- Availability
Before and after
Before. One order page serves everyone. Dispatch scrolls past the rate to find the trailer type, billing scrolls past the stops to find the fuel surcharge, and when a team needs a panel moved, someone files a ticket with whoever built the recipe and waits. The workaround in the meantime is a second Orders board with the columns hidden, and the two boards drift apart.
After. An administrator opens any order, arranges its tabs and panels on a live canvas, and publishes; every order page changes at once, and nothing changed for anyone until that moment.
The page being arranged is the record page, and what a detail view is covers it. The tool is View Builder, the name on its menu item and on every screen it opens, and this page uses that name only. Which roles see which of the panels it places is its own page, detail view permissions. The clip above opens ORD-28, finds View Builder in the header’s menu, opens the Order Summary view on the canvas and opens the settings of one panel. Nothing in it is saved.
What it does
View Builder is one flyout with three layers inside it: the record’s Views, each view’s panels, and each panel’s widgets.
A view is a tab on the record page
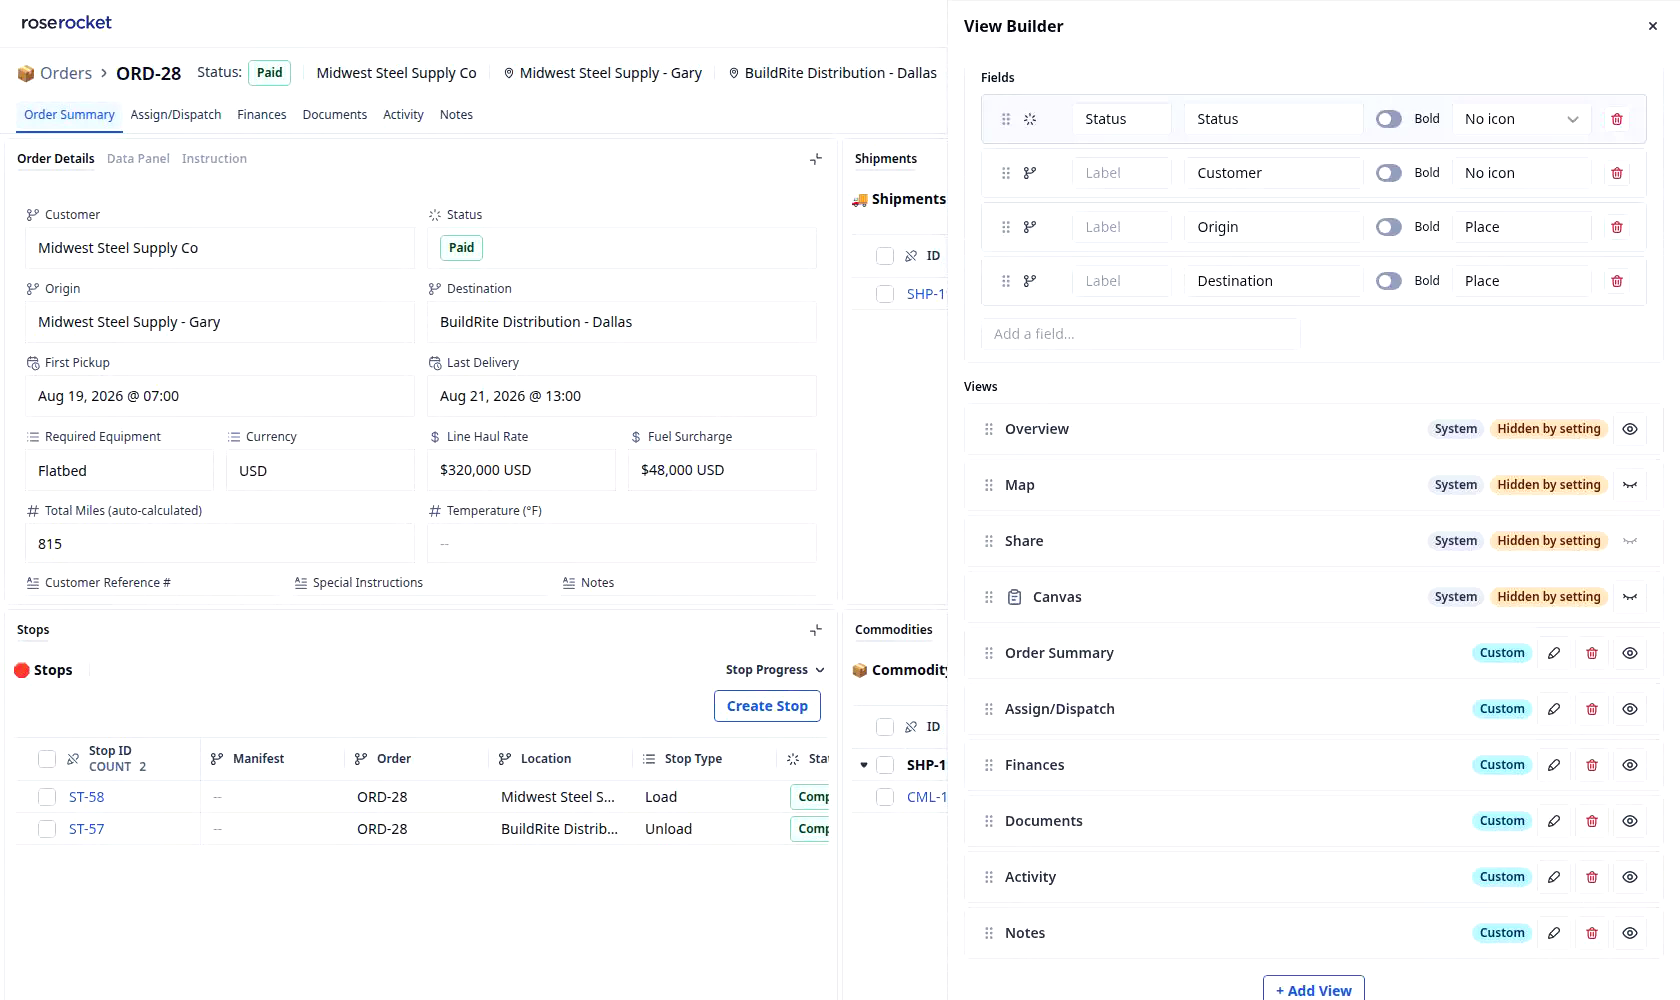
The strip of tabs under a record’s header is the Views list in View Builder. Every view is the same record laid out a different way, and a reader switches views without leaving the record. On an order, for example ORD-28, the tabs read Order Summary, Assign/Dispatch, Finances, Documents, Activity and Notes, and the Views list carries those six rows marked Custom, each with Edit view, Delete view and Hide view. Above them sit the rows marked System, the views every record type ships with, which you can hide but not edit. Dragging a row up or down reorders the tabs for everyone who opens that record type, once published.
A panel is a box of widgets, with a gear
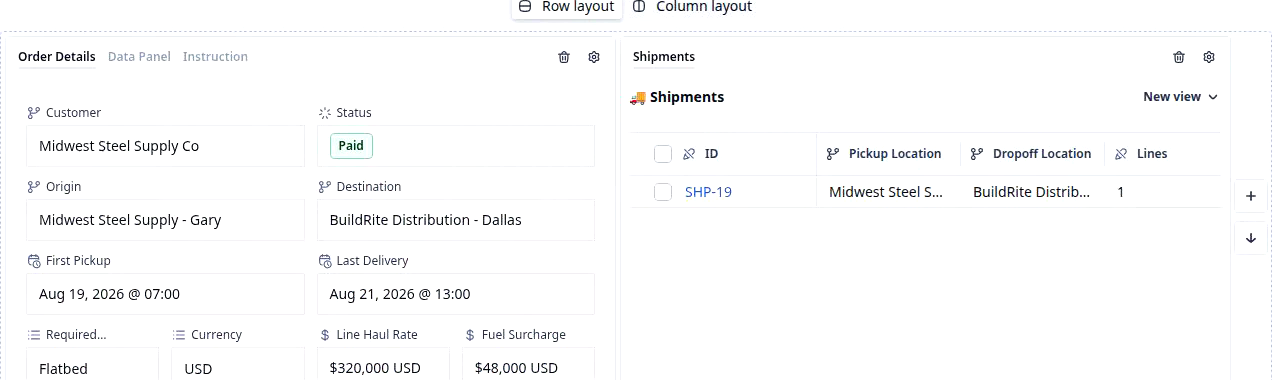
Inside a view, each box is a panel. A panel holds one or more widgets, and when its layout is Tabs those widgets appear as the small tabs in the panel’s own header, so a record page has two kinds of tab: the views under the record’s title, and the widgets inside a panel. Every panel on the canvas carries two icons at its top right, Delete panel and Configure panel, the gear. On ORD-28’s Order Summary view, for example, the first panel is Order Details with Data Panel and Instruction as its other two widgets, and the Shipments panel beside it is a list of the shipments that belong to this order, the same records the company-wide Shipments board lists. Panels sit in rows called groups, drawn on the canvas as dashed boxes; the Order Summary view is two groups of two panels.
Open View Builder from any record
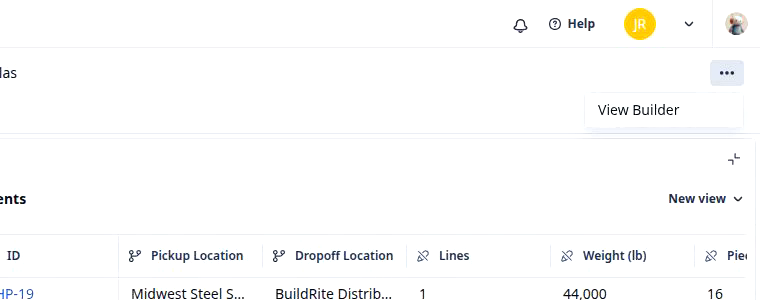
View Builder is not under Settings. It opens from the record it will change, as an organization administrator:
- Open any record of the type you want to lay out, for example the order ORD-28 from the Orders board.
- Click the three-dot button at the right end of the record header, after Help and your avatar. Its menu has one item, View Builder.
- Click View Builder. A flyout opens on the right with three parts: the Hide recipe views switch, the Page header card, and the Views list, with Cancel and Publish at the bottom.
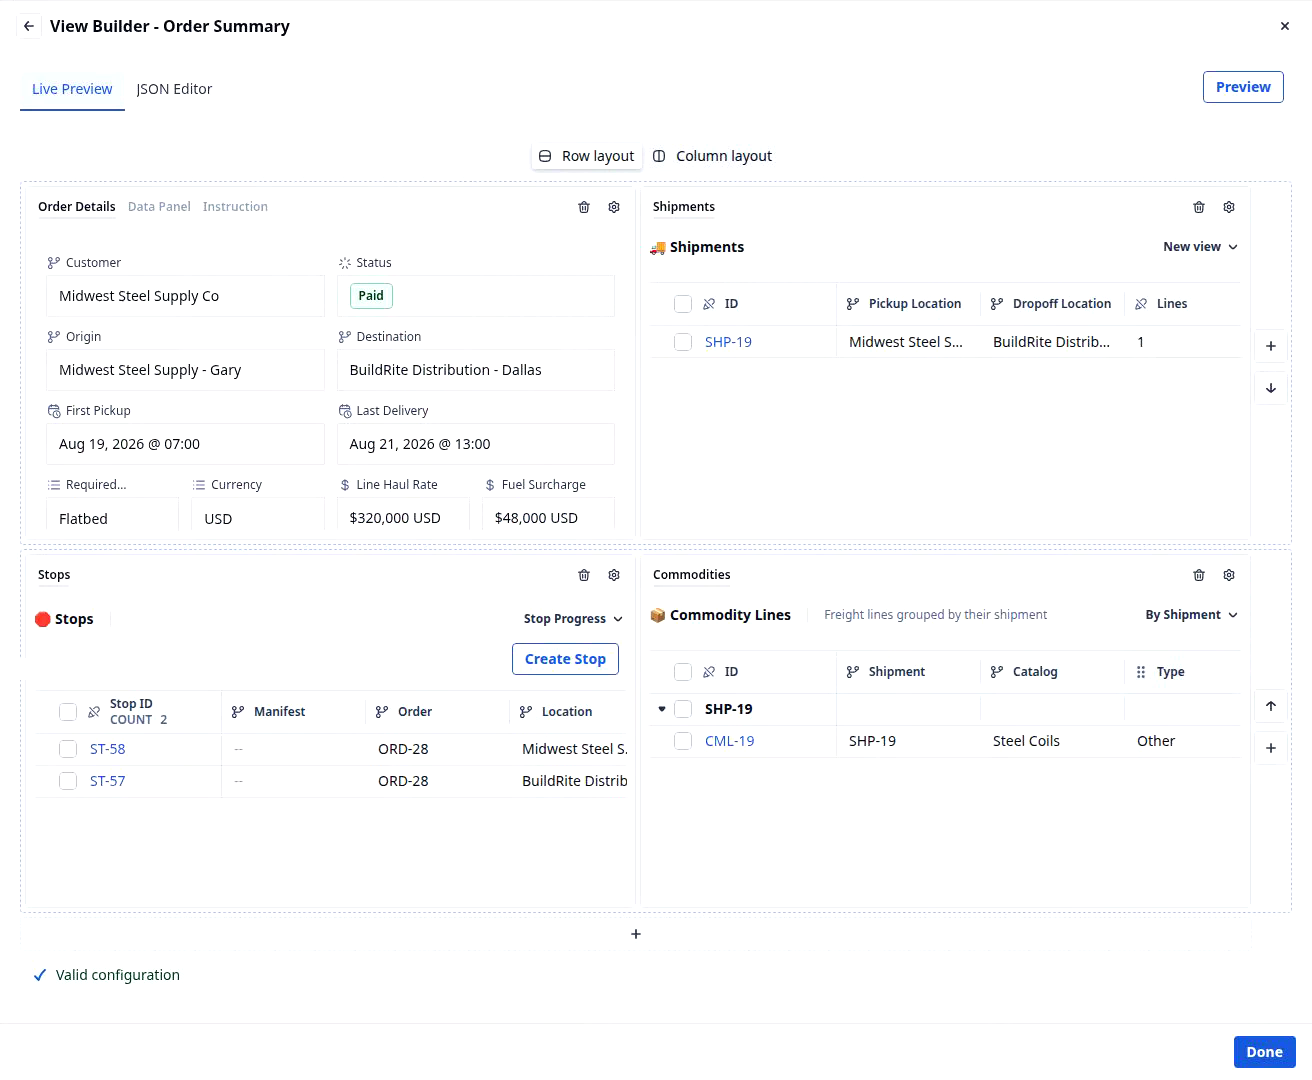
- To see how a view is built, click Edit view, the pencil, on any Custom row. The list swaps for the canvas, headed View Builder - Order Summary for that view.
Build a basic view, from an empty canvas to Publish
A new view starts as one group, one panel and a placeholder widget, so the canvas shows something at once. For example: “A Billing view for finance, with the rates form on the left and the order’s invoices on the right, published Friday after the last run.” From the flyout’s Views list:
- Click + Add View at the bottom of the Views list. The new view joins the Custom rows; give it the name your team will read as a tab, for example Billing.
- Click Edit view on its row. The canvas opens on Live Preview, drawn against the record you came from, with the JSON Editor tab beside it for anyone who prefers to type the layout.
- Choose Row layout or Column layout at the top of the canvas. Row layout stacks groups top to bottom and lays their panels side by side.
- Click the + bar under the last group to add a group, and the + on a group’s right rail, Add panel to group, to add a panel beside the ones it has. The arrows on the same rail, Move group up and Move group down, reorder the groups.
- Click the gear on a panel, Configure panel. Set Panel layout, click + Add widget, pick the widget, and type the Label your team will read on the panel’s tab. The trash on a widget card removes it; the arrows reorder the tabs.
- Read the line under the groups. It reads Valid configuration when the layout can be published; fix anything it names before you leave.
- Click Preview at the top right to see the view without the dashed outlines and gears, then Done to return to the Views list.
- Click Publish. A confirmation lists every view you added, changed, deleted or reordered; confirm, and the new tab is on every record of that type at the next page load. Cancel leaves without publishing.
Choose a panel’s widgets and how they show
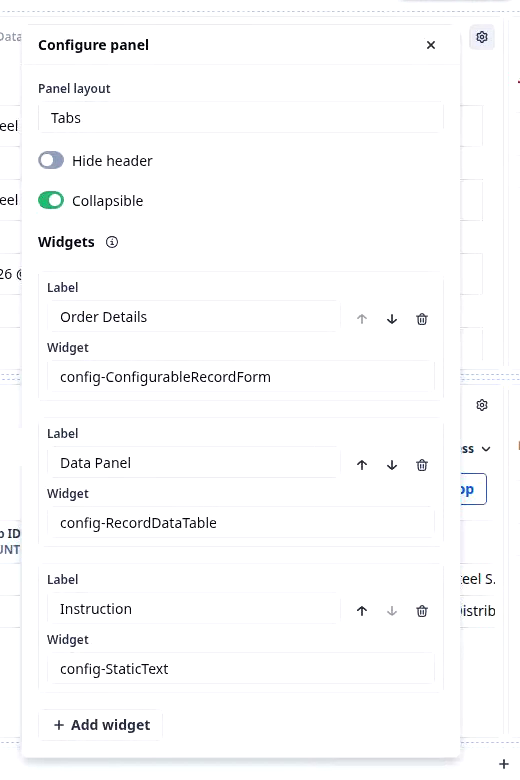
The gear is where a panel gets its contents and its manners. Panel layout decides whether several widgets share the box as tabs or stack under one another; Hide header drops the panel’s title bar; Collapsible lets a reader fold the panel shut. For example: “Put the stop-progress buttons and the proof-of-delivery photos in one panel as two tabs, so the dispatcher flips between them without scrolling.” What stays automatic: each widget reads the record you opened, so a form widget shows this order’s fields and a list widget shows this order’s shipments. What stays curated: which widgets, in what order, under what label.
Put the fields a billing clerk needs in the header
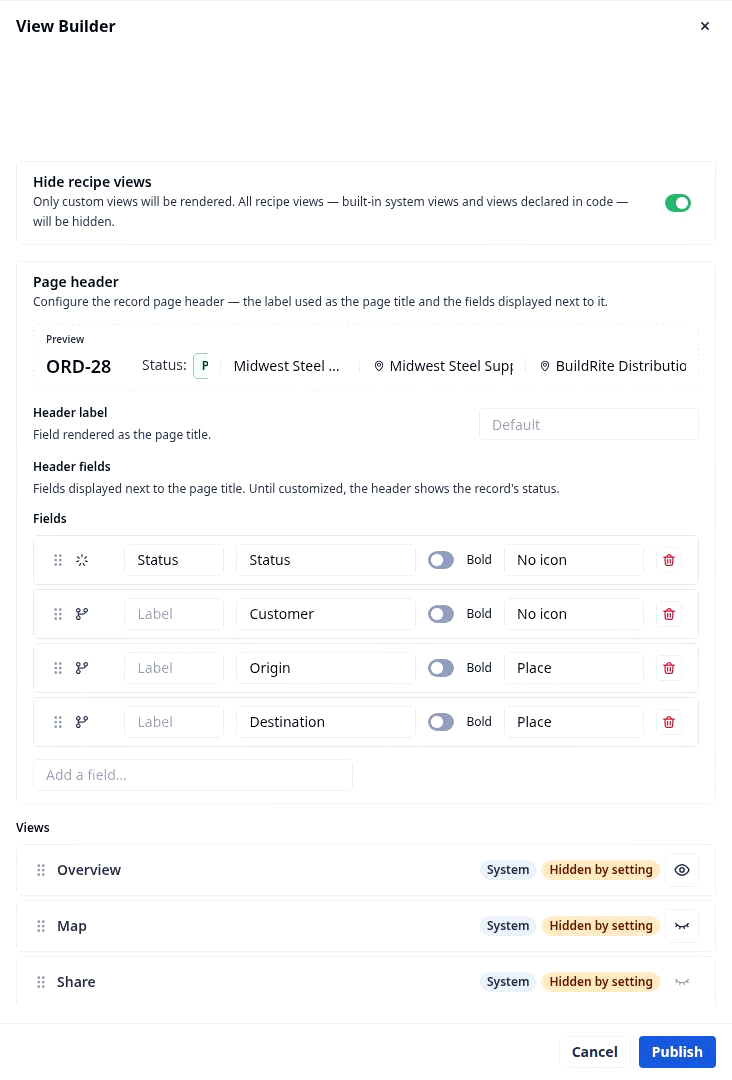
The strip beside the record’s title is the Page header card, and its Header fields rows are the fields it shows, in that order, each with a Bold switch and an icon. The card previews the result against the record you opened. On ORD-28, for example, the strip reads Status Paid, then the customer and the two places with their pins. For example: “For the clerk who opens fifty orders a morning, put Customer, Line Haul Rate and Fuel Surcharge beside the title and leave the stops in a panel.” What stays automatic: until you add a field, the header shows the record’s status. What stays curated: the fields, their order, and which one is bold.
Hide recipe views so your team sees only yours
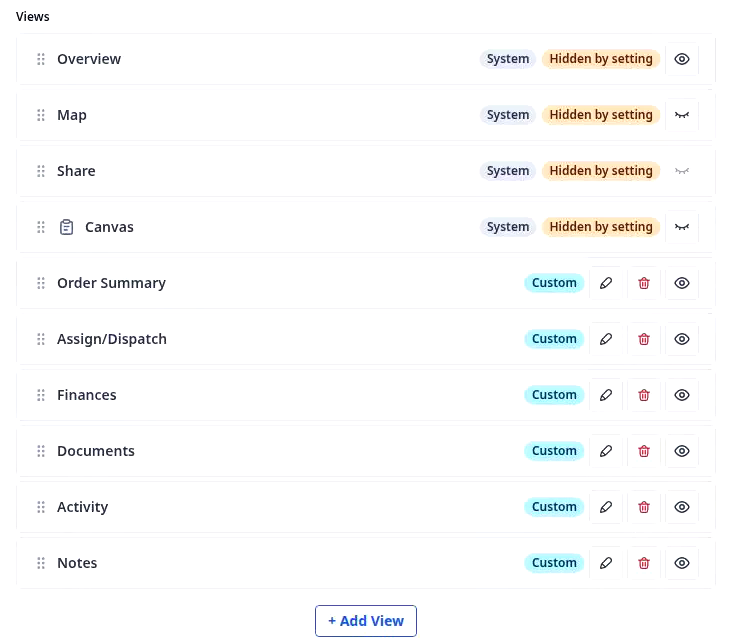
Every record type ships with views you did not build, the rows marked System, and the Hide recipe views switch at the top of the flyout takes all of them off the tab strip at once, so only the views marked Custom show. The eye on any single row hides or shows that one view. For example: “Give the driver’s record one view named Dispatch, with the next stop, the map and the documents, and hide the rest so there is nothing else to tap.” What stays automatic: a hidden view is hidden, not deleted, and comes back when the switch is turned off. What stays curated: which views exist and the order their tabs appear in.
Lay out the form itself in Object Builder, once
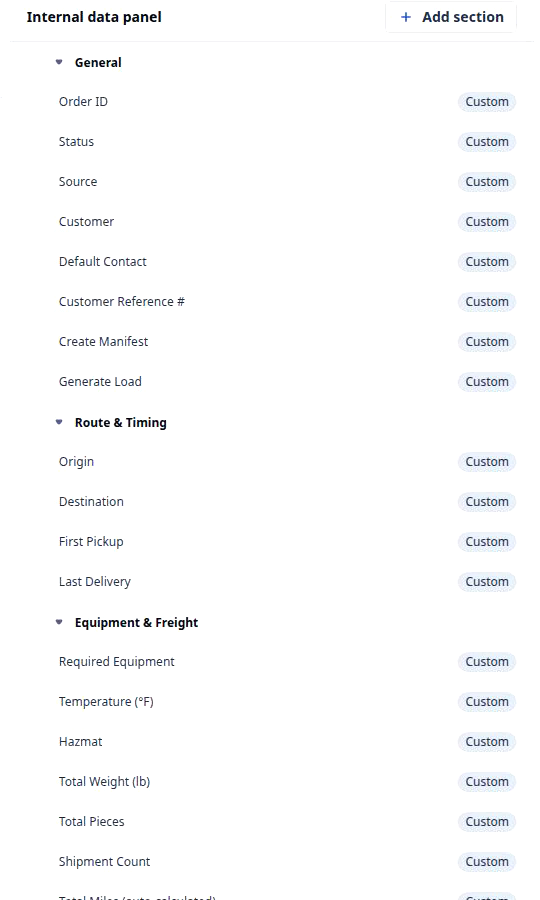
The Order Details widget shows a form, and the form’s sections and fields are not View Builder’s job: they are arranged once per object in Object Builder, under Settings › Builders › Objects. On the Order object, for example, the Internal data panel groups the fields under General, Route & Timing and Equipment & Freight, so a dispatcher finds Required Equipment under the heading they would have guessed, on every view that carries the form. The same field is a candidate for a header slot here, a board view column, a filter, and a condition in a rule. What stays automatic: every view that shows the form shows the same sections. What stays curated: the sections and their fields, in Object Builder, and which views carry the form, here.
Availability
View Builder is in the header menu of every record page for organization administrators; other roles do not see the menu item. The flyout opens under a note that calls it an internal tool for custom record views: the views your recipe shipped with, and any view declared in code, are listed and can be hidden or reordered, but not edited or deleted there. The views you add sit beside them, and the layouts your orders already use are the ones the canvas opens on, so there is nothing to recreate. When the layout is right, the next question is who sees which panel; give dispatch, finance and drivers their own order view walks that through with detail view permissions.